Friday, 6 November 2015

Year 12's Respiration Song

Hey Tyrone, what are you listening to? 

Oh it's a new song, it's called the Respiration Rap Trap!

How does it go, maybe I know it!

"oxygen and glucose, this changes to CO2 and water yaaaa, don't forget the ATP-"

"-ok ok, let's just listen to the full rap!

Here you go:


Lyrics: 

Tamaki Production
Biooo Babes
Yaa-a-

Oxygen and Glucose

VERSE 1
I’m like hey what’s up? Respire.
Need some energy for my cell life pro-ces-ses.
I just wanna turn, (pause) some glucose into it.
Use mitocondria, oxygen and the glucose.
Show you how to change it, making ATP for sure.
Make some more stuff, like water and a gas.
Carbon dioxide, what a waste product.
Energy requires, four main reactions.
With in and outer membrane, and a cristae, matrix though.
Man I swear I love it how it works in me for,
Making energy, in my different tissues,
Muscles they have many, cause of work that they do,
Other tissues they have less, less energy on show.

CHORUS
Oxygen and glucose
this changes to, CO2 aaandwater, yeaah,
Don’t forget the ATP,
It’s the energy for the cell from respiration yeaah
Mitochondria baby,
The folded cristae in-crease surface are-aaahh
Mitochondria baby,
Found more in the tissues that need more energy

I’m like “hey whats up?” Respire.

VERSE 2
Glucose enters the cell, in the cytoplasm it sits,
splits in two, this is called glycolysis.
I just might tell you now that the two molecules
Are called pyruvate, and now more reactions accelerate.
They go in mitochondria, and the link reaction happens,
on the cristae they roll through to the Krebs Cycle happy that they’re still on the cristae, there’s like a thousand reactions,
all you need to know is,
that the Krebs cycle happens.

CHORUS
Oxygen + glucose
this changes to,CO2 aaandwater, yeaah,
Don’t forget the ATP,
It’s the energy for the cellfrom respiration yeaah
Mitochondria baby,
The folded cristae in-crease surface are-aaahh
Mitochondria baby,
Found more in the tissues that need more energy

I’m like “hey whats up?” Respire.

VERSE 3
Electron-tran-sport chain pumps out hy-dro-gen ions,
Falling down concentration gradient it’s own,
Makes the ATP, now you definitely know,
Cause respirate or nothing,
Re-re-respirate or nothing!!

Yeah,
You heard my class.
We sound like a million mitochondria on this track.
And there’s more mitochondria in cells and tissue that need more energy to do more work.
Put your mitochondria where your mouth is so it can keep running.
Mitochondria make cell money.
We rollin in it.
Yeah.
Tamaki Productions.
Shh.


Monday, 2 November 2015

Year 11 Practical End-Of-Year Challenges..

The end of the year for seniors is closing fast, and my Year 11 class have finished all of their internals for the year. As their class doesn't sit any science exams at the end of the year, the last few days have been spent either sending students off to other classes to finish off any overdue work there, or... something else. 

"What should that 'something else' be?" I asked myself at the start of the last week. For some of my Year 11's, this week may be their last taste of science at school, ever. Others have chosen one of Tamaki's three science options in Year 12 and will experience another year or two. 

I decided that the best use of our last few days together would be to do practical science; designing a solution to a problem, testing it, making modifications, testing it again, and then of course a bit of healthy competition between the end-products.


Challenge 1

Our first challenge was to find the best launching strategy for the best shuttle, based off the activity from NASA and the Design Squad.

Full pdf of their activities can be found here:  https://www.nasa.gov/pdf/308966main_On_the_Moon.pdf 


Litani found the best way to use the balloon as a launcher was not to have it full, but instead to have only the smallest amount of air in the balloon and clap it shut, to push it out all at one time. He also found that the bendy end of the straw needed to be fully inside the balloon.  

One of the students, Mac, spent most of that lesson designing an arm-propelled shuttle (i.e. a shuttle he could throw rather than launch with the balloon) He built a brilliant one out of straws that looked a little bit like a Star Wars fighter plane with the x at the back. He weighted the middle of it with some rubber tubing, and it flew beautifully. 


Challenge 2

Mac's design gave rise to the second challenge; designing a plane to fly the furthest when thrown outside. I thought Mac would re-build his Star Fighter but instead he made a new creation!

Mac's new creation

Litani and Jordan opted for streamlined paper planes reinforced with bamboo skewers and weighted in the nose. They were also held together with sellotape. 

Litani and Jordan's planes

Jordan and Litani had a close battle, after Alex threw his 'UFO' entry...


As for Mac's entry... 

Duui was skeptical about the prowess of Mac's plane, and went and stood about halfway down the field and said there's no way it'd be able to get past him! You can see where he's standing in the video, and whether Mac's plane went past him or not...


Challenge 3

Our final challenge was to protect an egg dropped from a height. Students were given packs of equipment to use, including a plastic bottle, bubble wrap, 2 plastic plates, 4 straws, 3 pipe cleaners, a small newspaper, tinfoil, styrofoam beads, 2 balloons, scissors and unlimited sellotape. Each pack was missing one of these items and students got to choose which pack they wanted. 


Mac created a landing pod space shuttle sort of contraption. You have to open at least 3 hatches to see the 'egg-stronaut' in the pod! 


Litani created a parachute sort of contraption, with balloons attached later. 


Jordan created a sort of indestructible tank and quite cleverly; a landing pad! 


Zeph created a brilliant parachute contraption using the tinfoil between balloons and a cushioned suspension landing base that the egg sits on. His fell so gracefully when it was dropped!


Our first test was off the Marae deck at my shoulder height - and 100% off all drops were successful! All of the eggs survived, even with Onesi's drop of Duui's creation hitting Zeph's on the ground and bouncing up and off. 

We had to step up our testing to determine a winner. We went to B-block and dropped them off the second story balcony. 


And would you believe it, 100% of the eggs survived AGAIN!! 

As a last resort we went out into the quad and students launched their egg protectors up into the air, throwing them up as high as they possibly could! Finally we had four out of nine of the eggs crack. 

I was so impressed with the creativity of 1104 in this last challenge. They were engaged with the challenge of protecting their eggs, designing, standing on chairs to test how hard their creation landed, making modifications... It was so cool to see! 

I hope 1104 had a good year of science, and if they're taking Bio next year I will see them again; if not then I hope they leave science proud of the credits they've achieved throughout the year and with positive memories of their time learning science at Tamaki College :)


Thursday, 29 October 2015

Human Evolution Card Game for Revision

I recently bought a new card game that my flatmates just adore playing. Sometimes I bring it to school and let my tutor class play it, and two of them have even gone and bought themselves a set to play at home. It doesn't take too long to play a game, somewhere between 15-30 minutes, and can be played with up to 5 players. More than that and it doesn't really work. 

Said game shall remain unnamed, but it was so popular in my tutor class that I wondered - could it be adapted into a study game to help students? I thought about it for a while and thought it would fit well in Year 13 for Human Evolution, to help students become more familiar with key hominids and their features and tool cultures etc. Then I set about making them.


The cards look like this before you print and laminate them: 


and like this when you're playing with them: 


 The story is fairly simple. 

Each player is a museum curator out to collect full sets of species to display in their museum. As a museum curator you can charge the other players entry fees to come and see your species collections, or to come and attend conferences at your museum too. You can also add famous speakers to present about your collections, to charge a higher entry fee. You can go on expeditions into Africa to see if you can find more species or even tools for your collections. Sometimes your museum is robbed, or a pickpocket steals an item from one of your collections. You need to have enough money on the table to pay to visit your friends' museums, otherwise you'll have to pay them with items or species from your collections, argh!!! 

Whenever a species collection card is put down students have to read the name of the species and the piece of information about them out loud. Whenever someone steals from another player and adds it to their own collection, they have to read it out loud again too! This is key, otherwise you're just playing cards and not really learning. You could also quiz them at the end of it. 


Here's a photo of us playing the game on our last day together for the year. Sela has just told John she's going to rob his museum! 


Happy to be playing :)


Overall the card game took me about 3-4 hours to print, cut out each card, stick it to a piece of cardboard, cut it out again, laminate them all and cut them out for a THIRD TIME! Sigh. But if you're willing to invest that time then you'll have a card set to last you forever and the kids love playing it!


Feel free to access it in my Google Drive and make yourself a copy.  
The full rules are in the doc. If you enjoy playing it with your students, maybe you can go out and buy the real game to play with your family and friends, if you can work out what it is :)


Thursday, 15 October 2015

Year 12 Mutation Maltesers Game

Year 12 Bio recently played a game to illustrate how mutations enter the gene pool and change in frequency, and how mutations can be helpful, harmful or neutral (and this can change if the environment changes!)

Equipment needed for this game: 
teaspoons
tablespoons
forks
plastic forks with the middle prongs removed
bowls
shot glasses
maltesers


In this game, students 'live' in different populations at tables around the room. These populations all have a similar niche and are trying to gain access to the same resource - maltesers. These maltesers are found in bowls on a table in the middle of the room.


The game progresses through several rounds or 'generations.'

In the first round, each group has the same adaptation for gathering their resource - plastic forks. Students needed to gather a resource and keep it balanced all the way back to their table, where they could deposit the resource and pass on the fork to the next person. Each group roughly gathered the same amount of maltesers, and they all survived to produce the next generation.

In the next generation one of the populations had a mutation - they lost the middle prongs of their fork! We played another round, and the group missing the middle prongs were unable to gather any maltesers, because the gap in the middle was too big! 

Alas, this was a harmful mutation. It didn't enter the gene pool of the overall population because it failed to help them gain enough resources to survive, and unfortunately that group couldn't pass their genes or alleles onto the next generation. 

(We let the group come back in with a normal fork though, so they could keep playing).


The next generation had another mutation - their adaptation to help them gather was a tablespoon! This turned out to be a helpful mutation, as it was easier to balance and they could gather resources faster than the other groups. 

As they were more successful, in the next generation more groups had tablespoons, as the helpful allele became more frequent in the gene pool.

After a few tablespoon generations another mutation occurred - a teaspoon! I thought this mutation would also be harmful but it turned out to be neutral, as having a smaller spoon didn't seem to affect the ability to balance a malteser in it. 

However!!! Suddenly the environment changed!!


The bowls of maltesers became shot glasses of maltesers. Suddenly having a smaller teaspoon was an advantage in the new environment, as the teaspoon adaptation was too large to get into the bottom of the shot glass. 

The group with the smaller teaspoon SHOULD have had much greater access to maltesers and the next generation should have had a lot greater frequency of alleles for smaller teaspoons. 

However, my class are resourceful and very competitive, and the tablespoon groups quickly worked out that they could use the handle of the tablespoon to scoop out maltesers! So that point was sort of lost, but the rest of the game was good to illustrate how mutations arise and change in frequency in populations over generations, depending on whether they help or harm the organisms' ability to survive or reproduce in their environment.


Mutations in the story:
Fork (at the start)
Fork with prongs missing (harmful, gap too wide for maltesers)
Tablespoon (helpful - easier to balance than fork)
Teaspoon (neutral - turned out to be no different from table spoon)
Change of environment to shot glass (teaspoon advantage now to fit in the glass)


Wednesday, 7 October 2015

Charades with Y13 on the Last Day of Term

It was the last day of Term 3, and the last day with our student teacher Miss Graaf... 

What should we do! Definitely learning, but FUN, silly learning! 

John, Kitana, Rapture and Norman had been studying Plant and Animal Responses with Miss Graaf for 4 weeks, so they became group leaders on this day, and went over key ideas and vocabulary from the topic with the other students in the class. 

At the end of our lesson we played charades, acting out the vocabulary in pairs and trying to guess what was being shown. Having pairs meant that students had to discuss a strategy before acting it out and make sure both of them knew what the word was and what to do to act it. 

I have sooo many good videos but I'm struggling to get them off my old Galaxy S2 and onto my Mac.. the two machines are not friends :( 

Here is the short video, unfortunately it only includes two rounds of charades! 


Saturday, 12 September 2015

The Human Evolution Zoo Trip


Year 13 Bio has been learning about Human Evolution for the last 2 weeks; as you can see below, Mokani has been receiving encouragement and support in his learning from Bones aka the freshly renamed "Sally the Skelly"


On Thursday last week we attended the Auckland Zoo Trends in Human Evolution session. This began by students comparing the skulls of a human, chimpanzee and gorilla. 

Key vocab about the skull differences included:
Foramen magnum
Zygomatic arches
Sagital crest
Nuchal crest
Masseter muscles (chewing muscles)
Brow ridges
Parallel (hominid) or parabolic (human) jaws and teeth
Protruding jaws
Canine teeth for aggression or not


Next, in pairs or threes students were given 2-3 skulls and asked to work out which was the most primitive, and which was the most recent, using what they had just learned from the compare-contrast activity.


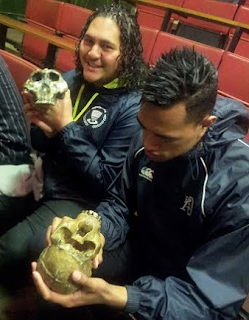
Sela and Siale making friends with their skulls


Mokani and John looking at the zygomatic arches (cheek bones)


Rapture thinking about her skull.. 


Our student teacher Miss Graaf sharing her knowledge with the boys.


Then we compared the full skeletons of humans and gorillas, which from top-down included:
shoulder joints,
shoulder blades, 
rib cages,
spinal shape,
arm length, 
wrist joints,
palm length,
finger curve or not,
thumbs and grips (precision grip for humans),
pelvis shape,
gluteus maximus attachments and size
valgus angle,
leg length,
ankle joints,
grasping big toes or straight big toes,
arches in feet

The next activity was to bring all the skulls to the table and try to work out their order overall. This also included working out which skull was Ardi and which one was Lucy!  Turns out that Lucy also had a male friend with her, showing sexual dimorphism as his skull was significantly larger than her own. 

We found out that the main pattern that has developed over time is an increase in cranial capacity (cc), or brain size in comparison to body size. Species in the Homo genus have much larger brains for their size, and humans in particular have a large forehead with room for a frontal lobe. We know what frontal lobes are responsible for because of Phineas Gage's injury with a tamping iron... Having a larger brain allows for more complex behaviours, planning, problem solving, and communication. 


Then we moved on to tools! Everyone was given a bag with a replica tool inside of it, and asked to put their hand inside and imagine how to hold it, whether there was a comfortable way, what it might be used for.. then we took them out, looked at them, and grouped them:


Oldowan tools are associated with Homo habilis (aka Handy Man) and are also called Pebble tools. They are basically the core of a rock shaped by a few blows to have a sharp edge. They were mostly used for smashing or crushing. 


Archeulean tools have a typical teardrop shape. They are kind of like the swiss army knife of tools - they can be used for smashing, crushing, throwing, stabbing, slicing, as a hand axe etc. The core of the rock is still the main tool. These teardrop Acheulean tools remained fairly unchanged for 1 million years! 

1.5 million years ago (mya) if you were holding this Acheulean tool, you were holding the most sophisticated technology on the planet. 


Mousterian tools were less generalised and more specialised for different jobs like slicing, cutting, spear heads, hand axes, etc. They are usually made from flint. They were often made from the flakes that come off the core, and require a lot more planning to make.


We concluded our trip with a wet walk around the zoo in the rain for an hour. We got to see a baby giraffe, the new Auckland elephant, 2 sleepy lionesses, a curious meerkat who came and said hi, a red panda doing laps up and down a tree and John holding a convincing conversation with a flamingo. 


In other news, Tamaki College may be getting some of our own ancient skulls from +Karen Ferguson and her awesome 3D printer! Different African fossils can be downloaded from this website, if anyone else has a 3D printer at their school :)


1104 Learns about Density

We've started a new topic for 4 credits at the end of Term 3! And depending on how hard we work, we could even do ANOTHER 4 credits in Term 4! On Thursday we started looking at different types of metals, making observations, and we weighed 1 cm cubed samples of them. 


Then yesterday we graphed their density (g/cm3) before learning what density actually is - the amount of particles packed into a given area. Objects or liquids that are more dense have more particles packed into the same volume.

First we watched this video.

Next I revealed to students the list of the liquids available to them and gave them each a piece of paper with two blank test-tubes drawn on it. Students got to draft a density tower that they thought would be most accurate, and then have a second guess by drawing a second test tube with some of the orders of liquids changed around.


The liquids we used were:
water (pink food colouring)
dishwashing liquid (green)
olive oil (yellow)
conditioner (white)
water + corn starch (bright red, lots of food colouring)
golden syrup (golden)
shampoo (white)
soy sauce (brown)
sunscreen (white)
baby shampoo (yellow)


I quite liked this activity because there was a lot of discovery learning happening. I didn't know the exact order in advance, and there were a lot of questions being thrown around like "is soy sauce going to sink through water?" which I got to answer with "I don't know, go and get a test tube and find out  before you add it to your density tower." There was also some logical thinking happening, like when Duui decided that dishwashing liquid would be more dense than water because when he uses it at home it moves to the bottom of the sink, and Brandon had a think about oil spills and water. 

I discovered that soy sauce is more dense than dishwashing liquid, because it sank right through the dishwashing liquid in my tower and sat on top of the conditioner layer. 

Most students guessed that the golden syrup would be the most dense. 


Here are some photos from our class:

Mac, David and Duui gently adding the next layer to their beakers. 


Mac's first attempt


Students working and cleaning out their beakers after failed attempts. It was quite good to get it wrong and have a layer sink through, because then they knew to add it earlier as it was more dense.


My attempt.


Mac's best "scientist face" as he studies his density tower - many more layers this time!


I think that this lesson (messy, loud, and a little silly) was a good one to illustrate density. 

Next week we'll have to start thinking about why cars and planes might be best made from more or less dense metals.. hmm...  


Friday, 26 June 2015

Envirogroup Goes to Greenbay


On Monday four of the Tamaki College envirogroup leaders +Mano Abraham+Racheal Kaitu'u+Bobbigrace vili and +Lana Poila went out to Green Bay to see what the finished product of daylighting a stream looks like.


We met with Konrad Heinemann, Tom Mansell and Josephine Bartley. Konrad and Tom were there to explain the process of daylighting a stream, while Josephine was there to learn like us.

Why was this trip so important? What does a stream in Green Bay have to do with the students and staff of Tamaki College? And why were Auckland Council engineers and project managers eager to take time out of their day to speak to us!?


The reason is that a similar project is now underway at Tamaki College! We have a pipe just like the one in the picture above running under our rugby fields, from under the library out to the reserve past the Rec. 


However, with all the development and new building happening in Glen Innes, Auckland Council has decided now is a good time to remove the stream from it's concrete prison and return it to a more natural state. 

There are lots of things that need to be considered; run-off, flow rates, water quality, fish passage, engineering considerations, 10-year flooding events, the stream ecosystem, preschool childrens' access and safety, Tamaki College security and aesthetics, council budgets, community interests...

The picture above shows the final product of the La Rosa daylighted stream; every rock and plant and tree stump was purposely placed. This will eventually be what the Tamaki College stream might look like - with a little less water!


This picture showed the middle stage of construction, revealing the pipe - and what it looks like now.


Together we all went for a walk around the park, following the stream as it meandered through the natural dips that had been slightly enhanced... we walked past this particular section and could see what stream daylighting engineering technology used to look like - some rocks held in place by chicken wire! Auckland Council has refined their technique since then...


This is an outdoor classroom at La Rosa, and Tamaki College is lucky enough to be getting their own outdoor classroom too! Again, different considerations need to be balanced; the cost of building by Auckland Council, the design selection, how much our students can be involved in the construction (e.g. carving, trades, woodwork, earthworks), the cost of maintenance after Council hands over ownership to the school, etc.

The Council were proud of this particular outdoor classroom design at La Rosa because it gets people down to the stream and interacting with the water. Safety does need to be considered, but I guess you can't wrap everyone in cotton wool! I think overall they made the right choice, because there is a bridge to the left that can also be used to cross the stream but apparently all the students and community members walk down the banks and cross the stream using the stones! 


At La Rosa the Council also planted an orchard but the community nearby quickly took over to maintain it. Preschool children have painted the signs to label each of the trees, and a worm farm/compost was being run as well to fertilise the plants. The Council was even told to back away from the project because the community had it all under control! Our Tamaki students were most excited by the orchard as well, I think.


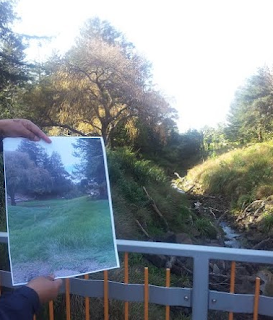
This is a 'before' picture held up to the view now. Again, every tree trunk and rock were deliberately placed to create riffles and oxygenate the water, or provide shade or shelter for invertebrates, eels, etc. 


This was another picture of the stream now, I think it's such a pretty picture it could even be a wallpaper for my laptop!


We finished our loop around with the stream at a covered sign, which the Auckland Council boys were kind enough to give us a sneak-peak at!

This photo shows the soon-to-be-unveiled signage created by the community about the daylighting project and stream ecosystem. It is made of a repurposed section of the original pipe that the stream was held in! What a cool example of recycling and community engagement - the artwork on the sign came from them as well :) 

Each of the envirogroup members came up with ideas that they would like to incorporate into the project - these can be added to all the ideas they got from Green Jam at Macleans College last week! 

The next Envirogroup Meeting will be jam-packed with ideas and discussion :) 

Feel free to come along and join us on Thursdays at lunchtime in the Whare Kai - pizza occasionally provided :P